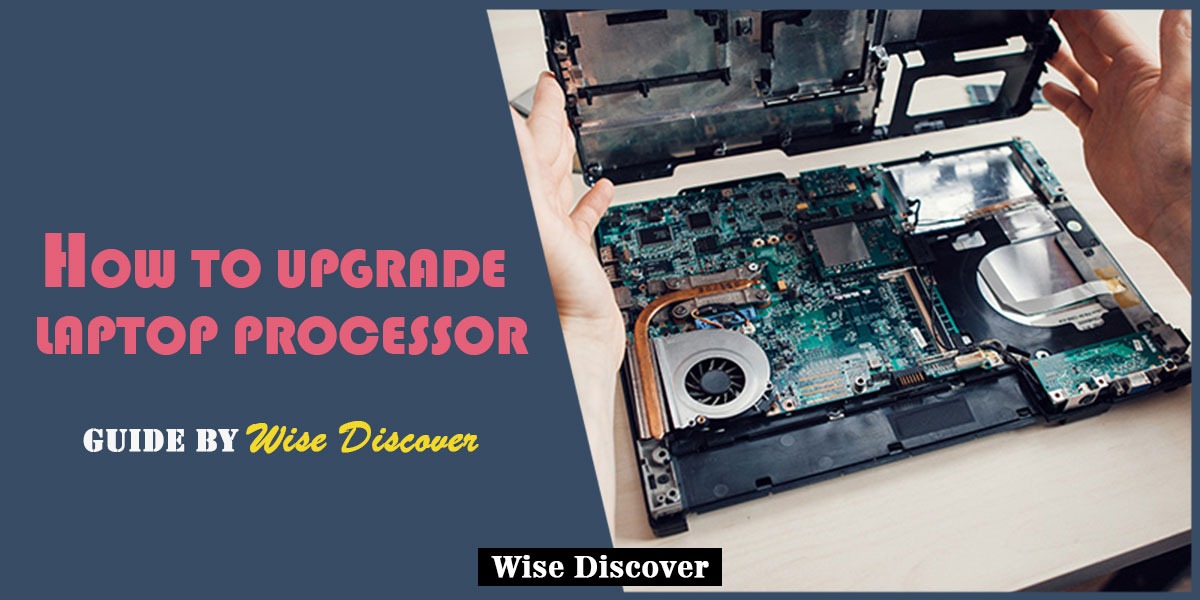
Everyone wants to upgrade his level up to meet the changing trends in tech. this opportunity to upgrade offers enhanced performance and greater speed. So if you want to upgrade your laptop’s processor to the latest model then you are likely to get benefited from raising CPU benchmarks.
Though the up-gradation is a quite efficient and budget-friendly process, saving you a lot of money yet giving you advanced options but it is not easy rather it requires greater knowledge and skills. Therefore one must check all the boxes before taking the risk because after all, no one wants to get their laptop damaged. In this guide, we have provided a step-by-step process on how to upgrade a laptop processor and we hope that it remains helpful for you at the end of the day and you take all the benefits from your new, speedy processor. One important thing is that the new processor may not only fasten your processing but may have an effect on the temperature of your laptop. Moreover, you should learn how to maintain your laptop’s performance to make the up-gradation worthwhile.
Since the process is tricky and requires a great deal of knowledge should keep the following points in mind:
- Upgrading your laptop’s processor can limit the warranty.
- The process requires lots of skill, caution, and patience all at once.
- The upgrade may damage your laptop.
- If the BIOS isn’t compatible your laptop can fail to boot.
Check the compatibility of the processor:
Compatibility is not a mere word in terms of tech rather it encompasses almost all the limitations and details of the devices and tech gear. If you don’t find a processor compatible with your notebook then there is no point in trying to upgrade. For example, thinking about upgrading apple’s or any other extremely slim laptop’s processor is just a waste of time as most such laptops cannot be upgraded as the processor comes integrated into the motherboard. However, in the text below, we will mention that how can you find a compatible replacement for your old laptop processor upgrades? So let’s begin:
Finding a compatible replacement for your old laptop processor upgrades:
Google is the best friend so just type “[your notebook model] CPU” in the search bar and it will show the results of the CPUs that are compatible with your laptop.
Laptop’s service manuals usually include a list of all the processors compatible with your laptop. You can download one from the site and see what processor you should go with.
Check out the laptop’s manufacturer’s website; contact them to know about your system, motherboard, and all the upgrades available. You can also check the comments and review to know about the experience of other users as this will let you know what processor your laptop has good chances to go with.
When you chose the correct and compatible process after research then you can dig deep further into the process.
steps to upgrade the laptop:
Read manuals carefully:
Maintenance manuals are there for you with all the information on you how to open the laptop and make changes to it. It also tells that whether the CPU is soldered or not, if yes then you should stop thinking about the upgrade. In most laptops, you have to open the whole back panel to gain access to the inner components however some laptops allow access just by removing some screws or the back-lid only.
Update your laptop’s BIOS to the latest:
Your laptop should be equipped with the latest BIOS version if you want it to support the new processor. If it does not then forget about it as an uncompatible BIOS and processor means that your laptop will not boot or the display and the system will start showing odd behaviors.
To check the BIOS version of your laptop checks the manufacturer’s website’s support section. It will give you the results of the latest BIOS version and the compatible processor for your laptop’s model.
wear antistatic wrist strap:
Now just fold your sleeve to get into the technical work. But first, get yourself skilled, and don’t forget to wear an antistatic wrist strap. This protects the internal hardware of your laptop from getting damaged due to frictional/statistic charges. The accidental static electricity discharge can completely damage sensitive components such as the motherboard etc. you can also prevent such damage by staying grounded.
Steps to follow after opening the laptop to make upgrade:
Now as you are ready for the process we should begin with some easy steps. These steps may vary in sequence because all the laptops are designed differently. So it is recommended to first check all of them at once before you start to unscrew.
Step 1: turn off the laptop
Step 2: Remove the Battery
Step 3: Remove the Back Cover
Step 4: Remove the Keyboard
Step 5: Remove the Upper Shell
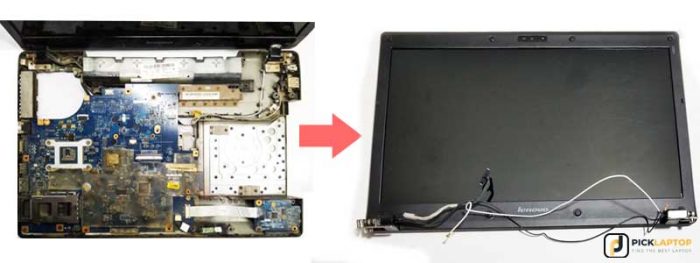
Step 6: Remove the Display Assembly
remove the heatsink a
Step 8: Replace the CPU
Step 9: Apply Thermal Paste
Reassemble
Turn off the laptop:
First of all, turn off the laptop and unplug it if it was plugged in the charging socket.
Step 2: Remove the Battery
Download the service manual before opening the laptop. It includes all the important steps that you need to follow. Most laptops open a similar way that is back-lid has to be removed to access the internal component. The first thing you will do is remove the battery however if the battery is in-built then it comes later. You have to be careful before removing the battery as you don’t want any part to get damaged due to the static charge.

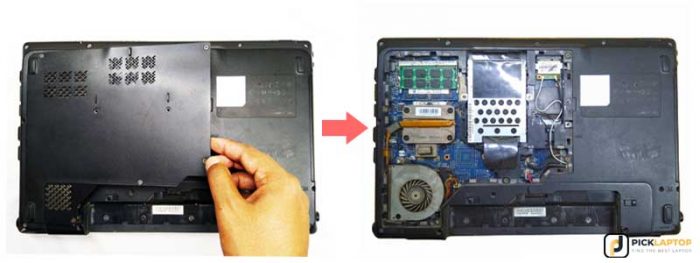
Step 3: Remove the Back Cover/lid:
Now remove all the screws to remove the back lid. Then remove the upper part as well. Place all the screws in a container or a safe place as you would not want them to get lost. If you see the hard disk drive the remove it as well.
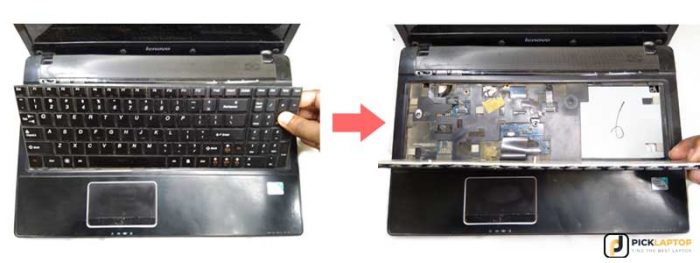
Step 4: Remove the Keyboard:
Now comes the keyboard, DVD writer, and wireless adapter. Remove all of them gently and carefully. As mentioned earlier the sequence may vary from laptop to laptop.
Step 5: Remove the Upper Shell:
Remove the upper shell. Remove all the screws and, ribbon, connector, etc. Recheck for any hidden screws.
Step 6: Remove the Display Assembly:
You will now be able to see the base of display hinges, just remove the display carefully by unscrewing the hinges. This step in some laptops may be the 4rth or 5th step again depending on the laptop. Well, unplug the video and Wi-Fi antenna cables to isolate the display and then put it aside.
Step 7: Remove the Heatsink:
You will be able to see the motherboard. If your processor is given on the upper side, then you can directly remove the heatsink’s screws as it is usually present on top of the motherboard. after removing the heat sink you can directly access the processor and graphics card. If the processor is not visible then you have to remove the motherboard out of the body by unclipping and unscrewing it.
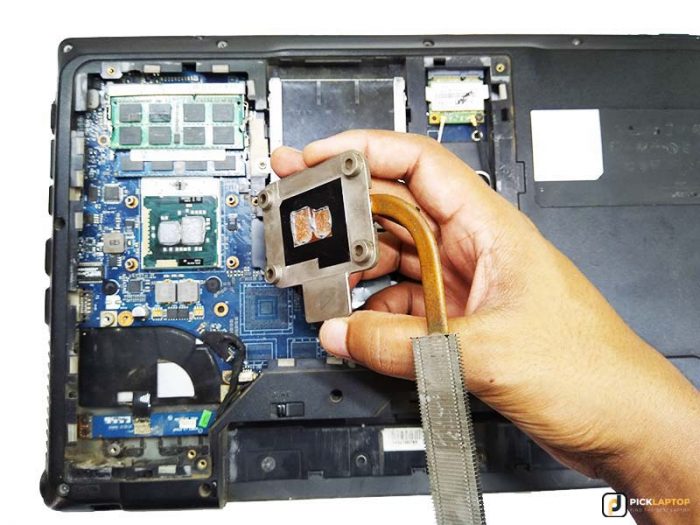
However, it is recommended to download and check the heat sink’s instruction manual as it is important because not every heat sink is the same and is installed differently.
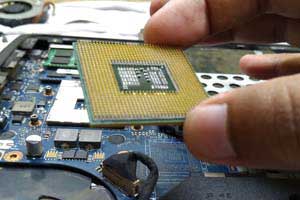
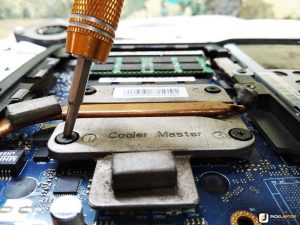
Step 8: Replace the CPU:
After removing the heatsink you will be able to see the processor slot. Remove the socket’s screw and carefully remove the square shape processor by lifting it straight up. after removing the CPU place the old one aside and pick the new one up and place it appropriately into the socket. It should automatically slip into the socket otherwise check for the proper alignment. the CPU should be replaced gently.
Make sure the CPU is replaced properly. After getting done with it you should turn the screw clockwise to lock the CPU socket. Now you are almost done.

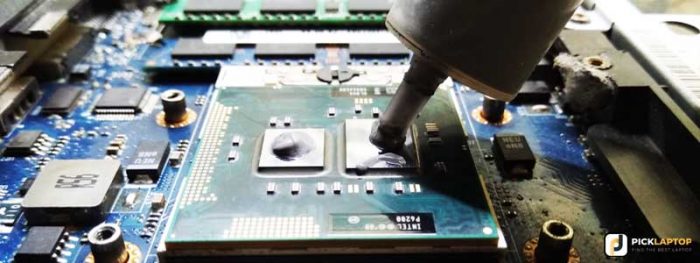
Step 9: Apply Thermal Paste
Now the next step is applying the thermal paste. Thermal paste is 99% isopropyl alcohol and a lint-free rag. It has a silver-gray color and it conducts the heat directly from a device to the heat sink. You should apply thermal paste from a new start. It should be evenly spread. The thermal paste on top of the processor should bridge the gap between your processor and your heat sink.
Reassemble:
After applying the thermal paste now just put the heat sink and all other components back at their place. Reassembling is usually the last step.
Testing:
Just to make sure that everything is alright plug in the laptop and boot it up you are done with everything. Enter the BIOS and check for the CPU. However, if windows fail to boot then you have to
Launch the Windows from new and start the process with your newly upgraded processor.
Thank you very much for visiting this site! Did you find this article helpful, or have any questions? Please feel free to comment below; we will get back to you shortly.
The reasons for which you should not upgrade your processor:
There are more chances of an incompatible processor. That can lead to issues and you may end up regretting it later.
The BIOS of your laptop, just recognize the new processor, or otherwise, it will fail to boot. Your BIOS should support the CPU as they are very sensitive. you can upgrade the BIOS of your laptop as well.
While opening the internal component and handling the process there are higher chances of the components getting damaged due to static charge, friction, or any other accident.
The laptop’s new processor may be fast running and may dissipate more heat. Your thermal fan should be enough to handle all the dissipated heat. The thermal heat is also a solution but it should be applied properly.
You should know ESD handling techniques to carefully install the processor or otherwise, you may end up damaging your processor.
Conclusion:
Hopefully, all the mentioned techniques will help you out while upgrading your laptop’s CPU, but this is much more trickier and critical than you think. A small missing point can lead to a damaged laptop. It requires greater skills, so when you get into work pay close attention, have some patience, and observe everything. At the end of the day, you will know that it all worth it.